Saturday, 3 December 2011

TOU 4 of 4


Next is the fitting.  I would assume that any sensible modeller will have fitted the functional tie-bars, to hold the point blades at the correct distance apart, before gluing the turnout to the baseboard, and ballasting it.  I cannot lay claim to being so sensible, so I’ll gloss over the selection and fitting of your personal choice of tie-bars.
The first step in installing the TOU is to solder the dropper wires to the point blades extending down through the baseboard.  I file a small v-shaped notch in the foot of the rail in the appropriate place for the wire to sit into, to make it as unobtrusive as possible.  A lot can be achieved in disguising the wires by carefully filing back the solder afterwards.
I use dropper wires that initially are much too long.  This is to make it easy to handle them.  Any extra length is cut off afterwards and either re-used for other dropper wires or put in the “spare wire” box for future use.  It’s the sort of thing that is never wasted. 
You then slide the dropper wires into the dropper tubes of the TOU.  A tip when doing this is to have the dropper wires of unequal lengths.  That means that you fit one at a time, rather than having to try and guide two bits of very thin wire into very small holes simultaneously – a task that requires at least four hands, or an awful lot of patience.
After sliding the TOU down the wires to the baseboard, it is necessary to fix it in place.  As mentioned earlier, you could use any method to do this, although I preferred to screw it down.  In locating the TOU, I wanted to make sure that the functional tie-bar was correctly set ar one end of its travel.  To do this, I used a small bulldog clip to hold the pointblade closed on one side, and then had the functional tie-bar set to one end of the travel.
The TOU was then screwed in place.  Once this was done, I snipped off the ends of the dropper wires so that they only just protrude from the bottom of the dropper tubes.  This will reduce the chances of them being accidentally snagged and causing or being caused damage. 
It would be possible to bend over the ends of the dropper wires in the bearing tubes to provide vertical restraint on the movement of the pointblades, to prevent them rising up.  I haven’t done this, as the type of cosmetic tie-bar that I’m using will prevent the blades lifting in this plane. 


After this, the motor to drive it was installed.  Again, how this is done is down to personal taste.  As the Conrad point motor that I am currently using does not have user-definable limit travel, I have decided to use a relatively long drive rod with a sizeable omega loop in it to take up the slack and hold the point blades firmly over.


To give you an idea of the scale, the omega loop is approximately 1.5cm across the diameter.  It was formed by hand using a few tweaks of snipe-nosed pliers in the length of wire.  This is in itself a length of the 0.8mm straight brass wire referred to earlier.  I’m sure that other methods of driving the TOU would be equally, or more efficient.
The black wire that you will notice behind the operating wire is simply the earth return wire from the point motor.  I have arrange the wiring of this particular board so that the live wiring feed goes up one side of the board, through the switches and associated components – point motors and electro-magnetic uncouplers – and then returns down the other side of the board.
The wiring is kept neatly in place with a few spots of glue from an ordinary DIY hot glue gun.  This is showing one of the uncoupling magnets, not the TOU!


As always, I’m not afraid to say when things have gone wrong.  In this case, you may notice that there is an extension piece on the end of the functional tie-bar.  This was simply because I only noticed after I’d installed the TOU that I had fitted it the wrong way around.  I had left sufficient material to drill a hole to attach the operating wire at the end of the tie-bar, but this was now at the opposite end.


Rather than take off the entire TOU and re-mount it having turned it through 180 degrees, I simply decided to use a spare bit of the 60 thou plasticard glued inside the end of the square tube.
The operating wire was passed through a small drilled hole, and the end bent over to hold it in place.  At the other, point motor, end, the wire is passed through the operating arm of the motor, with it manually set over at the limit of its travel.

And that’s it.  They have now been tested and work successfully.  The longevity of them naturally remain to be tested – ask me in five years or so if I’ve had any problems.  In the meantime, if I’ve missed anything out, or I’ve been unclear, please do drop me a mail to ask.
Flymo

TOU 3 of 4


Next I moved on to the construction of the tie-bar mounts.  These are simply two cubes of the larger size plastic tube mounted on top of each other.  Two things to consider:
-          if you are cutting the tube, as I did, with a piercing saw do clean off the edges of the tube earlier to remove any plastic swarf still attached that may interfere with the smooth sliding of the tie-bar.
-          the height of the mount should be dictated by the height at with the point motor provides drive.  In the case of the Conrad motors that I am using, this is quite high and I wanted to make the connection at the same height.
These really are just one piece glued on top of the other.

After this, it was time to try the functional tie-bar out for size, to ensure that it slid freely.  I actually found that the fit was a little looser than I had expected from two adjacent sizes of tube.  However the amount of slack was not so great as to cause problems, and it gave me a bit of wiggle room for fitting them in place.


The pictures do show a slightly different order of fitting the mounts as some pictures were taken during the build of the initial TOU, and some during the batch-build of the balance of them.  The differences aren’t critical though, and just show that there are many ways to go modelling in P4.
This is the completed unit, with the functional tie-bar fitted in place.


Two points to remember, thankfully neither of which I fell foul of, but I’m sure that I came close:
-          The copper-clad strip should face the outside of the unit, so that the dropper tubes extend out over the edge.  This is probably the only critical bit of the entire process, as there needs to be clearance for the dropper wires to come down from the point-blades past the edge of the TOU, and then go through the dropper tubes.
-          If you fit both the mounts to the base first, without including the functional tie-bar, you won’t be able to slide it in to the mounts afterwards.  There simply isn’t the free room to do this.  So it does all need to come together in one go.
So that completes the building of the TOU.
(to be continued...)

TOU - 2 of 4


The first thing that I did was to make the functional tie-bars.  These will sit below the baseboard and have the task of holding the dropper wires that come down from the pointblades. 
Much is made of the torsional stresses that are put in dropper wires when they are soldered in place on turnouts.  I’m not sure how much I buy into this idea, unless the section under load is particularly short.  However I saw advantages in keeping the TOU and the pointblades physically separate:
To do this, I used some small bore brass tubing.  This needs to be just a little larger in bore than the wire that you choose to use for dropper wires.  In this size, brass tube is more easily cut by rolling it back and forth under a sharp scalpel blade to create a score mark than by trying to saw it.  Using cutters will, of course, simply close up the ends of the tube, which is no good at all.
The length of the dropper tube isn’t actually critical.  I used the length shown in this picture to make both tubes for this tie-bar.


The dropper wires are very flexible, and I didn’t need to rely on the accuracy of the functional tie-bar to keep the pointblades the correct distance apart.  Nevertheless, to ease the stresses and strains of holding the pointblades in place, I made the two dropper tubes 16.5mm apart.  This was measured on the copper-clad strip, and as you can see two saw cuts made for the tube to sit in before it is soldered.  This just helped keep it located correctly and at right-angles.
As you can see in the next picture, I later cut a further gap in the copper clad to insulate the dropper tubes from each other.

In this picture you can see that all of the tie-bars have been made.  I have four turnouts on the board that I am building, so four was the number that I made.
You can also see that the first functional tie-bar has been glued to a section of plasticard square tube.  This is the smaller section – in my case ¼” in size.  This was done simply with some two-part epoxy. Again, the alignment isn’t critical, but it should be roughly central, and roughly square, to the plastic strip.
The next, rather dark, picture shows the production of the mounting plates.  These are approximately 70mm by 30mm.  You could make them larger if you wished, but I wanted to be able to fit them reasonably easily underneath the baseboard.

The small squares of plasticard that are being fitted are an extra that may not be necessary for other modellers.  The smallest woodscrews that I have available to fix the completed units to the baseboard are still too long to go through the TOU, and then into the baseboard that is made out of 6mm ply without the ends of the screw bursting through the top surface.  Therefore by putting spacing plates, the screw goes fully in but the tip will not come out of the other side.  If you used thicker baseboard, or glued the TOU down rather than screwing it, these would not be necessary.
I made provision for three mounting points for the screws.  In practice only two, at either end, have proved to be necessary.  After the spacing plates were glued in place and dry, they were drilled with 2mm holes to take the screws.  Given that plasticard is fairly soft, this was just done with a drill in a pin-chuck.  There was no need for any machine tools or suchlike.
(to be continued...)

Turnout Operating Units - 1 of 4


I’ve been asked to do a write-up of the Turnout Operating Units that I am using on my P4 demo board.  I wasn’t going to do this until they had been installed and satisfactorily operating, although I had done a “finger-driven” test of how effectively they work.
These are certainly not an original idea.  I believe that the original Protofour TOU was produced on a similar concept, using sliding plastic curtain rail to provide the base.  The main criteria that I wanted to meet were:
  • Mounted below the baseboard
  • Cheap and easy to produce
  • Robust but not necessary to be “engineered”
  • Did not need to be relied on for gauging the switch rails
Turning to the last point, my philosophy was that these TOUs would drive the switch rails with an approximation of the correct gap between them.  However for the precise gauging I am using a “semi-cosmetic” tie-bar.  I use the term semi-cosmetic, as primarily the role is to look authentic, but it will also provide the exactness of the distance between the rails that cannot be produced from a flexible drive mechanism three or four centimetres below the railhead.
The materials used are all very commonplace.  You may have them already.  If not, all of them are readily available from Derek Russan at Eileen’s Emporium, and no doubt other suppliers.  I just know that Derek definitely does have everything available as that’s where I got most of my components from!  Usual disclaimer, no connection, etc.  The list is:
  • Copper-clad sleeper strip. I had offcuts from track-building to use.
  • Fine bore brass tube.  By fine, I mean something that will take a 0.45mm brass wire down the inside and be a sliding fit.  My tube came from some left-over from a High Level Models kit.
  • Straight 0.45mm brass or nickel silver wire.  The sort that comes in 12” lengths from various sources.
  • Thick plasticard.  I used some 60 thou that I had in the drawer, but the thickness is not critical as it is used to provide a robust mounting base.
  • Two sizes of square Plastruct tube.  One that is a loose sliding fit inside the other.  The dimensions, again, are  not critical, and I believe that I used 5/16” and ¼” for my TOU. 
This is the tube that I used.  As they always say, other makes and flavours are available.  The TOU’s themselves are roughly seven centimetres in width, so you can make a number of the units from the two strips in each packet.
(to be continued...)

Friday, 2 December 2011

Tie-bars fitted

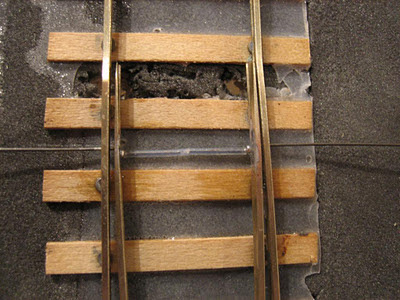
And in a burst of competent soldering, all of the remaining tie-bars went easily into place :-)


That's one of them.  Tomorrow I hope to fit the dropper wires to the point blades and connect it all up...

Flymo