Tuesday, 17 December 2013
Breathe in...
But carefully...
And preferably using one of these. In response to the question from John Lewis over in a different place about the location of my spray booth, about twenty minutes ago it was here:
Sat in the middle of my desk, which is located at 90 degrees from where my modelling bureau is. It's very convenient for the "overspill" of kits that is inevitable when something is being built.
And (hijacking John McAleely's discussion elsewhere) it is also the depository for all of the tools that I'm using when I decide to do some soldering. They are swept, en masse, from the left surface to the right surface to prevent them being splattered with liquid flux fumes. Since doing this, even if it is imperfect, the incidence of rusting has significantly reduced.
The particular subject of the spraying is the inevitable Coffeepot, receiving a coat of varnish over the transfers before progressing on to the weathering.
I think that the camera flash has caused the red lining to flare somewhat! It's nowhere near that bright in real life. Now to leave it for an evening to harden, and perhaps make some progress on the chassis...
Cheers
Flymo
Monday, 16 December 2013
Success...
Just for James, as he commented on model railways, Mr Sod and his Law...
This is the result of the third attempt at putting a lamp-iron (or rather socket, in LNWR style) on the front of the smokebox.
At least I managed not to make anything else fall off whilst putting this on.
Cheers
Flymo
Saturday, 14 December 2013
Today's discovery...
If you put amps from your Resistance Soldering Unit on the 4.5V setting through an LNWR lost wax casting of a lamp iron, it *very* rapidly collapses.
Which is a shame, as using the 3V setting hadn't allowed the solder to make a strong enough join. It's a good job that I have spares...
Cheers
Flymo
Friday, 13 December 2013
Driving forward
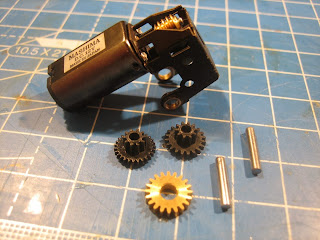
Whilst I was spraying up the body of the Coffee Pot, I took the opportunity to drift a coat of black paint across the unassembled gearbox as well.
This picture shows the result, but it's mostly to show what a neat and tidy solution the High Level gearbox is for this model. As with the Pug that I also built with a High Level chassis kit, this is a bespoke gearbox designed to fit compactly and unobtrusively within the loco.
I'm looking forward to installing it in the chassis and seeing how to fit the DCC chip around it...
Cheers
Flymo
Subscribe to:
Comments (Atom)


